How to Migrate WordPress Manually and with Duplicator
By Susan Daniero
WordPress
WordPress Migration
It can seem tricky to migrate WordPress when you want to switch hosts, especially when the WordPress Codex's page on migration is quite complex.
But if you're planning on keeping your domain the same and you only want to migrate your website to a new server, it can be a quick process that can be completed in 10 minutes, especially if you use a plugin.
Today, I'll show you how to migrate WordPress to a new server with the same domain name. You can use these steps for both single and Multisite installations of WordPress and I'll also show you how to expedite the migration with one of the most popular free plugins, Duplicator.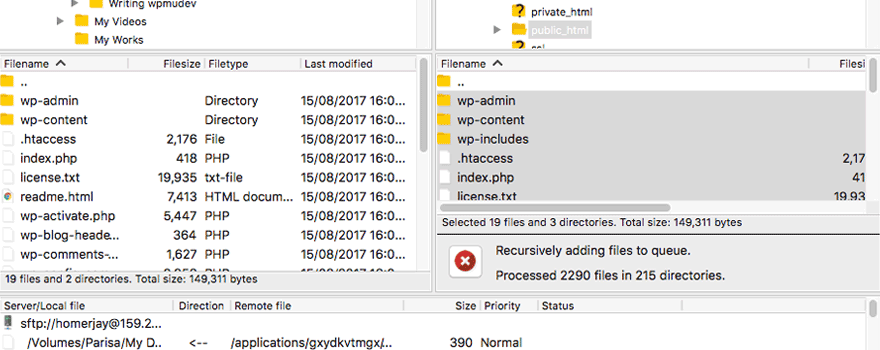 An example website being transferred to a computer using Filezilla.[/caption]
When the transfer has completed, you can move forward with the next step.
An example website being transferred to a computer using Filezilla.[/caption]
When the transfer has completed, you can move forward with the next step.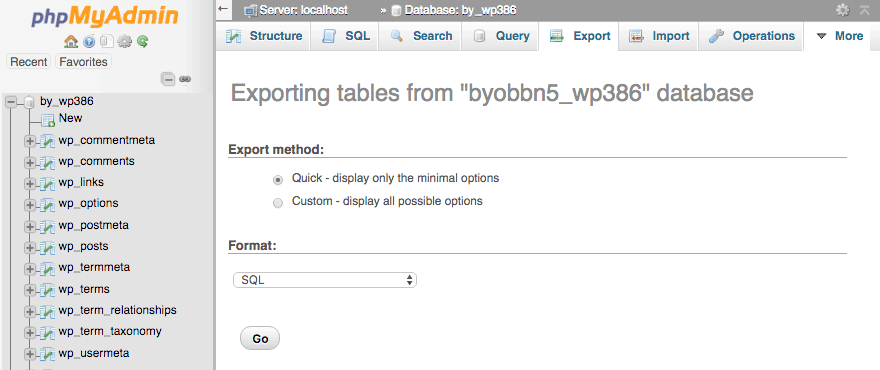 Save your database through phpMyAdmin Export page.[/caption]
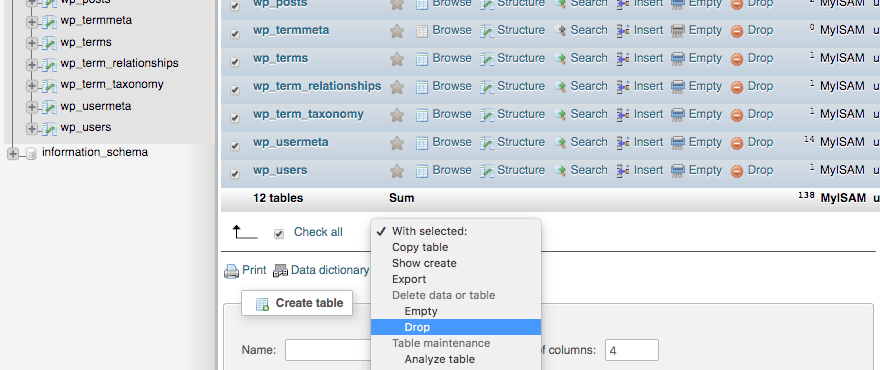 Select all the tables in your database, then drop them.[/caption]
When you're prompted to confirm the query you want to execute on the next page, click Yes.
Select all the tables in your database, then drop them.[/caption]
When you're prompted to confirm the query you want to execute on the next page, click Yes.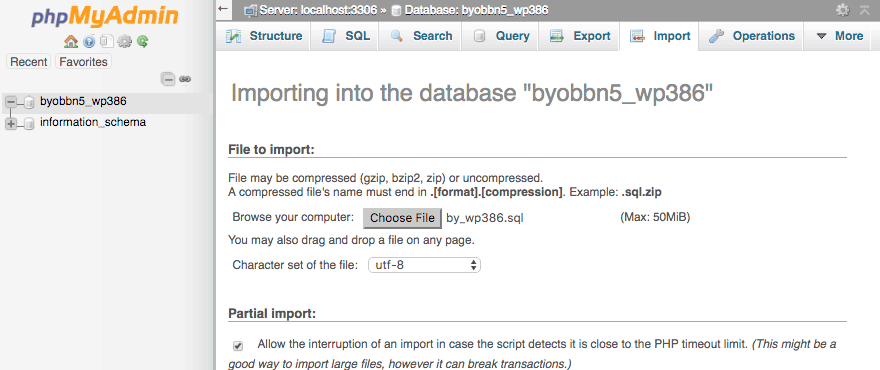 Select your SQL file from your computer, then import it by clicking Go.[/caption]
If all goes well, you should see a message on the next page to let you know the import process was a success.
It may also be important to note that you may have a limit to the size of the SQL file you're allowed to import. If importing your database fails because it's too large, you can still upload your database. It just takes a little extra fancy footwork.
For example, you can increase the file size limit or use SSH to import the file.
Select your SQL file from your computer, then import it by clicking Go.[/caption]
If all goes well, you should see a message on the next page to let you know the import process was a success.
It may also be important to note that you may have a limit to the size of the SQL file you're allowed to import. If importing your database fails because it's too large, you can still upload your database. It just takes a little extra fancy footwork.
For example, you can increase the file size limit or use SSH to import the file.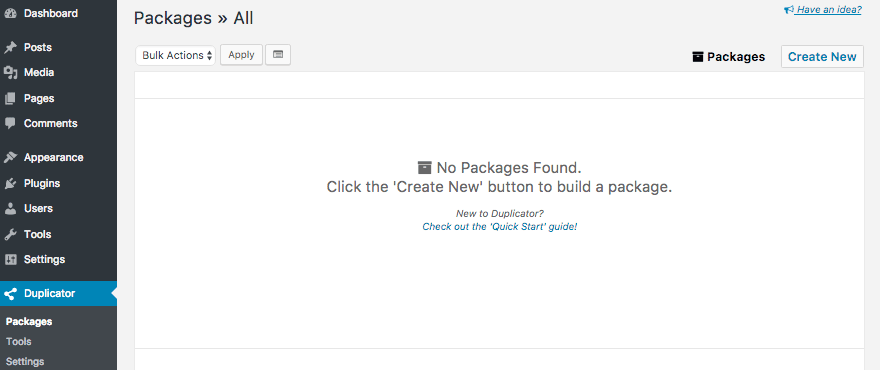 Click the Create New button on the Packages page.[/caption]
On the next page, the default settings should do just fine so click the Next button to continue.
Your site is scanned to evaluate if it's ready to be packaged into an archive. It's scanned for details such as the size of the website to be sure that it's not too large, which would make it difficult to import later on.
[caption id="attachment_247" align="alignnone" width="880"]
Click the Create New button on the Packages page.[/caption]
On the next page, the default settings should do just fine so click the Next button to continue.
Your site is scanned to evaluate if it's ready to be packaged into an archive. It's scanned for details such as the size of the website to be sure that it's not too large, which would make it difficult to import later on.
[caption id="attachment_247" align="alignnone" width="880"]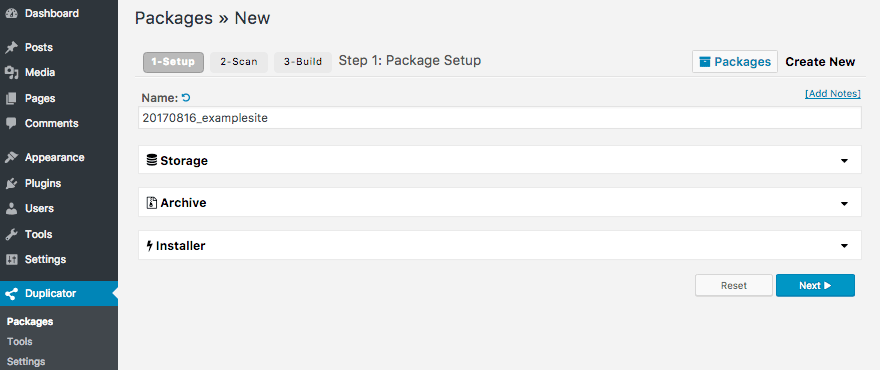 Setup your archive. The default settings should be sufficient.[/caption]
If you're happy with the results, you can click the Build button toward the bottom to create an archive for your WordPress site.
While it's best that all the results of the scan are marked as "good," it's not necessary.
[caption id="attachment_248" align="alignnone" width="880"]
Setup your archive. The default settings should be sufficient.[/caption]
If you're happy with the results, you can click the Build button toward the bottom to create an archive for your WordPress site.
While it's best that all the results of the scan are marked as "good," it's not necessary.
[caption id="attachment_248" align="alignnone" width="880"]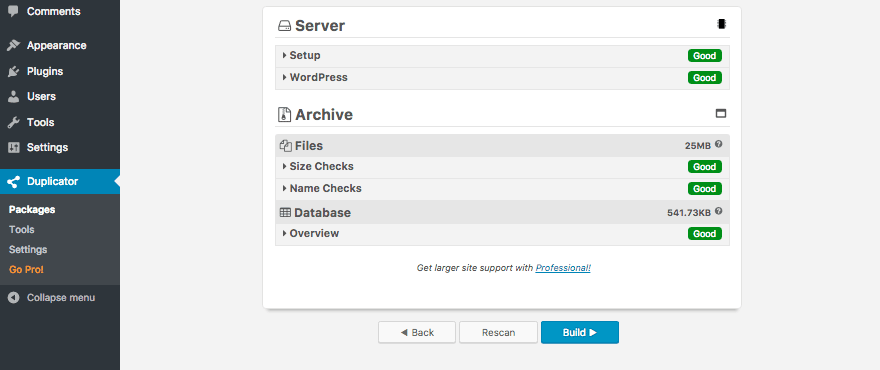 Once the scan is complete, you can click Build to create an archive.[/caption]
Depending on the size of your website, it may take several minutes to complete the build. Once the package has finished successfully, click the Installer button and save the file to your computer.
This file is needed to migrate WordPress without creating a fresh install.
Next, click the Archive button and save the file to your computer as well.
Once the scan is complete, you can click Build to create an archive.[/caption]
Depending on the size of your website, it may take several minutes to complete the build. Once the package has finished successfully, click the Installer button and save the file to your computer.
This file is needed to migrate WordPress without creating a fresh install.
Next, click the Archive button and save the file to your computer as well.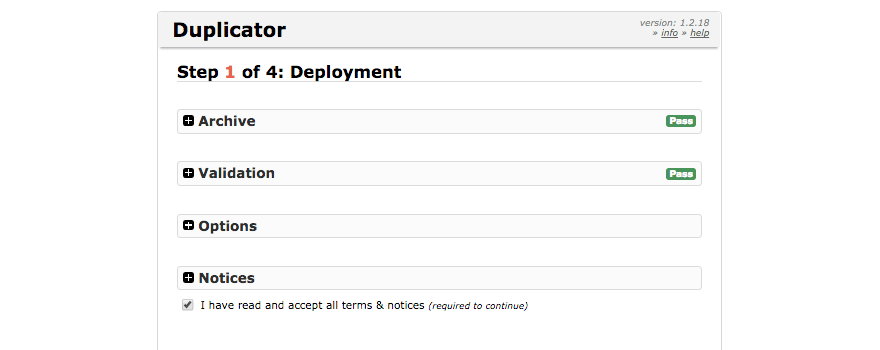 Check the box to agree to the terms and notices, then proceed to the next step.[/caption]
On the next page, be sure to select the Connect and Remove All Data option in the Action dropdown box.
Then, enter your database details that were previously mentioned above when you were creating a new database in cPanel.
Once that's done, you can optionally test the connection to your database with the details you entered by clicking the Test Database button.
When you're confident in the connection, click Next.
[caption id="attachment_250" align="alignnone" width="880"]
Check the box to agree to the terms and notices, then proceed to the next step.[/caption]
On the next page, be sure to select the Connect and Remove All Data option in the Action dropdown box.
Then, enter your database details that were previously mentioned above when you were creating a new database in cPanel.
Once that's done, you can optionally test the connection to your database with the details you entered by clicking the Test Database button.
When you're confident in the connection, click Next.
[caption id="attachment_250" align="alignnone" width="880"]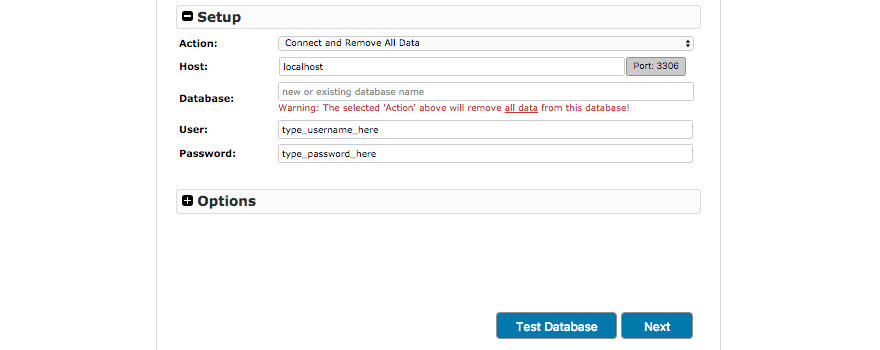 Enter your database details and test the connection or continue to the next step.[/caption]
A prompt should appear that asks you to confirm your submission. You can double check the details listed to make sure they're correct, especially if you didn't test the database connection. Click Yes to continue.
Enter your database details and test the connection or continue to the next step.[/caption]
A prompt should appear that asks you to confirm your submission. You can double check the details listed to make sure they're correct, especially if you didn't test the database connection. Click Yes to continue.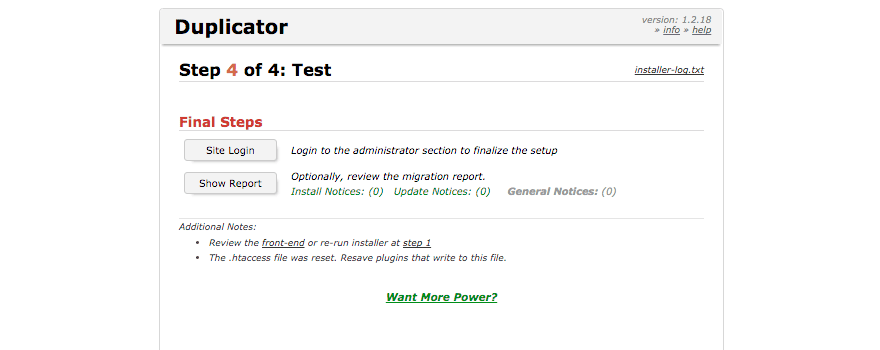 Click the Site Login button to sign in and double check the success of the migration.[/caption]
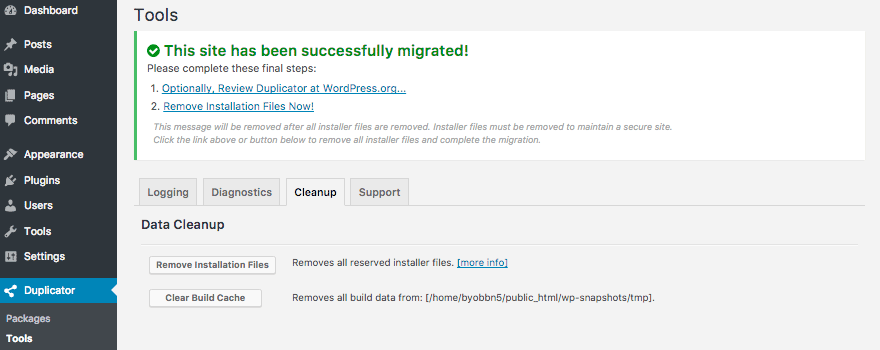 To finish the migration, remove the installer files.[/caption]
Once the file remover process is complete, you should see a confirmation message. If Duplicator isn't able to automagically remove the installer file, you can manually delete it in your FTP client.
Once the installer file has been removed, the migration of your WordPress site is done and dusted.
To finish the migration, remove the installer files.[/caption]
Once the file remover process is complete, you should see a confirmation message. If Duplicator isn't able to automagically remove the installer file, you can manually delete it in your FTP client.
Once the installer file has been removed, the migration of your WordPress site is done and dusted.
Manually Migrate WordPress
To manually migrate your WordPress site, follow the details below. The steps to move WordPress with the Duplicator plugin is detailed later on. To manually move your site, you need access to the following:- Your new server
- An FTP client of your choice
- An active FTP account
- Access to phpMyAdmin
- Your domain's nameserver settings
Download All Your Files
Log into your server with your favorite FTP client. Locate your site's root and copy everything to your computer. Most FTP clients let you do this by selecting all the files, then dragging them to the side of the screen that shows your computer's contents. [caption id="attachment_237" align="alignnone" width="880"] An example website being transferred to a computer using Filezilla.[/caption]
When the transfer has completed, you can move forward with the next step.Download Your Database
Now that you have copied your website's files to your computer, you need to also save your database there. To begin, log into your phpMyAdmin account. Next, select your database from the left-hand side of the page, then click the Export button in the menu toward the top. The default settings on this page are okay so you can click the Go button and save the file to your computer. [caption id="attachment_241" align="alignnone" width="880"] Save your database through phpMyAdmin Export page.[/caption]Create a New WordPress Installation
At the moment, you should have all your WordPress and database SQL files saved to your computer. Now, switch over to your new server and create a fresh installation of WordPress. You can install it the traditional way with the five-minute install or you can use an auto installer to speed up the process. Soon, you are going to replace your new installation with your old files, but before you do that, you need to make an adjustment to your wp-config.php file.Edit and Replace Your wp-config.php File
If you added anything to your original wp-config.php file, open up that file and copy what you changed. Then, download a copy of the wp-config.php file from your new installation via FTP and save it to your computer. Open the new wp-config.php file with your preferred code text editor and paste the changes you made to your old file, into your new file. Keep in mind that you shouldn't change any of the database information in the new file. It looks similar to the example below: [php]// ** MySQL settings - You can get this info from your web host ** // /** The name of the database for WordPress */ define('DB_NAME', 'database_name_here'); /** MySQL database username */ define('DB_USER', 'username_here'); /** MySQL database password */ define('DB_PASSWORD', 'password_here'); /** MySQL hostname */ define('DB_HOST', 'localhost');[/php] Keep the above-related details the same, but include other lines you added such as enabling the Multisite feature or forcing the use of an SSL certificate, for example. Save the new file and upload it back to your server where you created the fresh installation.Upload Your Website Files
Fire up your FTP client again and log into your new server where you want to migrate your website. Locate and go to the root of your new site. Transfer all your original files that you saved to your computer to the root of your new site, except for the wp-config.php file. That should be the only file you don't transfer over. If you do, your website is going to break. Once the transfer is complete, you can begin to upload your database.Drop the New Database Tables
Through your new host, log into phpMyAdmin and click on your new database on the left-hand side. Scroll to the bottom of the page and select the Check all box. Then, click the With selected dropdown box to the right of the checkbox and select Drop. [caption id="attachment_244" align="alignnone" width="880"] Select all the tables in your database, then drop them.[/caption]
When you're prompted to confirm the query you want to execute on the next page, click Yes.Upload Your Database
All the tables should now be deleted and you can import your original database. Start by making sure the database on your new server is still selected on the left, then click the Import button in the menu toward the top of the page. Click the Choose File button and select your original database's SQL file from your computer. The default settings should be fine the way they are so once you selected the file, click Go at the bottom of the page. [caption id="attachment_245" align="alignnone" width="880"] Select your SQL file from your computer, then import it by clicking Go.[/caption]
If all goes well, you should see a message on the next page to let you know the import process was a success.
It may also be important to note that you may have a limit to the size of the SQL file you're allowed to import. If importing your database fails because it's too large, you can still upload your database. It just takes a little extra fancy footwork.
For example, you can increase the file size limit or use SSH to import the file.Update Your Nameservers
By now, your website should be successfully migrated, but you aren't going to be able to access it on your new server without editing your nameservers and pointing them to your new host. Nameservers point your domain name to your server's IP address, which is how your website is accessed. Instead of entering the latter into the address bar of your browser to visit a website, a nameserver translates and connects it into an easily understood and memorable domain for humans. Your nameservers are typically set by your hosting provider so you can find them in your account settings or in an email you likely received after signing up for a hosting plan with your provider. if you're not sure what they are, you can ask your new host where you migrated your website. Then, copy and paste them to your domain settings. Each host and domain registrar is different so it's recommended you check out their documentation for details. After you have been able to successfully update your domain's nameservers, the new settings need to propagate. It typically takes around 12-48 hours and after propagation has completed, your website can be accessed from your new server. To be sure the migration and propagation has successfully completed, you can check your nameservers for your domain via a WHOIS database search. You can use a website such as WHOis.net and if the listed nameservers are the same as the ones for your new server, the process is done and you're all set.Migrating with Duplicator
The Duplicator plugin is the most popular free option to migrate WordPress websites. In a few minutes, you can completely migrate a single or Multisite installation of WordPress. If you prefer to migrate WordPress using a plugin rather than going the manual route, you can follow the steps below to use Duplicator.Install and Activate
Before you can start migrating your website, you need to first install and activate Duplicator on the WordPress installation you want to move. It installs like most other plugins. You can either search for it under Plugins > Add New in your admin dashboard or you can download a copy of Duplicator from WordPress.org and upload it to /wp-content/themes/ through FTP or SSH. Once it's installed, activate it to begin the migration of your WordPress website.Create a Package
Start by creating a website archive. In your admin dashboard, go to Duplicator > Packages and click the Create New button. [caption id="attachment_246" align="alignnone" width="880"] Click the Create New button on the Packages page.[/caption]
On the next page, the default settings should do just fine so click the Next button to continue.
Your site is scanned to evaluate if it's ready to be packaged into an archive. It's scanned for details such as the size of the website to be sure that it's not too large, which would make it difficult to import later on.
[caption id="attachment_247" align="alignnone" width="880"] Setup your archive. The default settings should be sufficient.[/caption]
If you're happy with the results, you can click the Build button toward the bottom to create an archive for your WordPress site.
While it's best that all the results of the scan are marked as "good," it's not necessary.
[caption id="attachment_248" align="alignnone" width="880"] Once the scan is complete, you can click Build to create an archive.[/caption]
Depending on the size of your website, it may take several minutes to complete the build. Once the package has finished successfully, click the Installer button and save the file to your computer.
This file is needed to migrate WordPress without creating a fresh install.
Next, click the Archive button and save the file to your computer as well.Upload Duplicator Files
Next, upload the two files you just saved to your computer to your new server where you want to migrate your website using FTP. Be sure to upload them to the root of your website, whether it's in a sub-directory or the root of your server. Be sure to remember where you placed them because you're going to need to visit the installer.php file in your browser later on.Create a New Database
Before you're able to move your website, you need to first create a database. You can do this through cPanel. Be sure to allow all privileges by selecting each checkbox before you complete the process. For details, check out Create a Database with cPanel and phpMyAdmin. Be sure to save these details because you're going to need them later when you migrate WordPress:- Host – This is typically localhost.
- Host port – This is usually a four-digit number such as 3306.
- Database – The database name.
- User – The username for the database.
Deploy the Installer
Once you have created a new database, run Duplicator's installer by visiting its direct link in your browser's address bar. For example, if you placed the installer.php and archive files in the root of your site, you would visit your-site.com/installer.php. Except, you would replace your-site.com with your actual domain. The first page of the installer asks you to accept all terms and the notices listed on the page. Click the corresponding checkbox and click Next since the other settings should be sufficient. [caption id="attachment_249" align="alignnone" width="880"] Check the box to agree to the terms and notices, then proceed to the next step.[/caption]
On the next page, be sure to select the Connect and Remove All Data option in the Action dropdown box.
Then, enter your database details that were previously mentioned above when you were creating a new database in cPanel.
Once that's done, you can optionally test the connection to your database with the details you entered by clicking the Test Database button.
When you're confident in the connection, click Next.
[caption id="attachment_250" align="alignnone" width="880"] Enter your database details and test the connection or continue to the next step.[/caption]
A prompt should appear that asks you to confirm your submission. You can double check the details listed to make sure they're correct, especially if you didn't test the database connection. Click Yes to continue.Finishing the Migration
The third setup page of the installer confirms the basic website details including the URL, the path on the server and the title of the website. All the other options can be left alone since they're set up with the details of the original WordPress site. You don't need to change anything and you can click Next once again. In the final step of the installer, you can click the Site Login button to sign into your newly migrated WordPress site. [caption id="attachment_251" align="alignnone" width="880"] Click the Site Login button to sign in and double check the success of the migration.[/caption]Remove Installation Files
After logging in, double check that the entire site migrated well and that nothing is missing or broken. If something's wrong, delete all the WordPress files for your website through FTP and drop all your database tables in phpMyAdmin as outlined earlier, then try again. If everything looks as it should, click the Remove Installation Files link or button in your admin dashboard. This final step is crucial as leaving the installer file intact is a security issue and it should only be used while you're migrating your website. [caption id="attachment_252" align="alignnone" width="880"] To finish the migration, remove the installer files.[/caption]
Once the file remover process is complete, you should see a confirmation message. If Duplicator isn't able to automagically remove the installer file, you can manually delete it in your FTP client.
Once the installer file has been removed, the migration of your WordPress site is done and dusted.